Here are a few tips to get you started.
Part 1: Team Creation
After choosing your team name, you will have 20 million to recruit your squad, which must include at least 9 riders.
As a beginner, you won’t have access to top riders right away. You’ll need to gain experience for that!
The recruitment I recommend is: 1 or 2 solid leaders, 2–3 domestiques suited to them, 2–3 average riders, and 1 or 2 riders with good regeneration and at least 75 flat, so they can join breakaways. You can also buy 2–3 riders in their thirties without any issue (especially leaders), as long as you balance it with younger domestiques to compensate for value loss.
Basic rider types are as follows (the values indicated are those that can often place in the top 7–8 of a race):
Climber = 85+ mountain
Sprinter = 88+ sprint (with 60+ flat)
Rouleur (flat specialist) = 80+ flat
Puncheur (hilly rider) = 67+ mountain and 75+ flat
TT specialist = 85+ time trial
Let’s go into a bit more detail, especially on pros and cons:
Climbers
Pros: Can win tours and major races (especially with strong stats + manager experience). Can drop opponents’ domestiques and create decisive gaps.
Cons: Very high salary; struggles to follow strong flat riders (e.g. 75+ flat vs 55–60 flat); often requires support from 2 teammates.
Sprinters
Pros: Can win many races since flat stages are frequent; easy to use; can earn a lot of money; can win even with slightly lower stats (e.g. 91 vs stronger rivals). Flat stat (65+) helps positioning and energy saving.
Cons: Can’t follow strong flat riders (80+); must be protected by teammates; few major races for sprinters; can be boring to build a sprint-only team; energy-consuming if you’re the favorite.
Rouleurs
Pros: Often cheap, effective, and always useful; various types (pure flat, hill-capable, etc.); versatile depending on secondary stats.
Cons: Lower resale value; otherwise few downsides.
Puncheurs
Pros: Very versatile; always useful; stats range from 67 mountain / 75 flat to 75 mountain / 81 flat (or more).
Cons: Can be expensive if strong in time trials and recovery.
Time Trial Specialists
Pros: Can win tours thanks to time trials, even those not suited to them.
Cons: Limited usefulness outside time trials.
There are also hybrid profiles (e.g. 80 mountain / 67 flat, or sprint-rouleurs like 80 flat / 75+ sprint).
Generally, the best riders are those you train. Riders recruited at 20 years old (racing from 21) have the highest potential due to more training time. There are always 4 training sessions per month (5th, 12th, 20th, 27th). Younger riders have higher chances of gaining stats.
It’s good to recruit young riders and complement them with experienced ones who can perform immediately.
Every month is equal to one year for your riders. (F.e : a rider is 21 y.old in april, 22 yold in May, 23 y.old in June etc.) A rider starts racing at 21 and retires at 40. He could stop at 34 if you sell him.
If you want to create your team by manually selecting your riders (with at least 9 riders), here are some example team setups to get started:
For each stat listed, the order is as follows:
Mountain / Flat / Downhill / TT / Sprint / Cobbles / Regeneration
For example, if I say: 49-60-75-50-89-63.5-40, it means the rider has:
49 mountain / 60 flat / 75 downhill / 50 time trial / 89 sprint / 63.5 cobbles / 40 regeneration.
If a value is written as “X+”, it means X is the minimum required for that rider type. Same for “X-”.
1. Sprint Team
1 leader: 49 < X < 52 / 62+ / 65+ (optional) / <55 / 88+ / 60+ / <45
1 lead-out : 49 < X < 52 / 65+ / 65+ (optional) / <55 / 86+ / 60+ / <45
1 launcher: 49 < X < 52 / 75+ / 65+ (optional) / <55 / 78+ / 65+ / <45
3 rouleurs: 49 < X < 52 / 83+ / 70+ (for 2 of them) / <55 / 53+ / 70+ / <45
2 domestiques: 49 < X < 52 / 73+ / 70+ (optional) / <55 / 45 / 65+ / >45
1 puncheur: 68+ / 75+ / 70+ / <55 / 55+ / 67+ / <45
If you have money left, keep it or buy a 10th rider to complete the lineup. My tip is usually to add a second puncheur, but be careful with salaries.
Salaries here are generally reasonable.
2. Puncheur Team
1 leader puncheur: 70+ / 78+ / 65+ (optional) / <55 / 60+ / 70+ / <45
2 puncheurs (helpers): 68+ / 76+ / 70+ / <55 / 55+ / 67+ / <45
1 breakaway rider: 58 < X < 62 / 77+ / 65+ (optional) / <55 / 55+ / 67+ / <45
2 rouleurs: 49 < X < 52 / 80+ / 70+ / <55 / 53+ / 70+ / <45
2 domestiques: 49 < X < 52 / 73+ / 70+ (optional) / <55 / 45 / 65+ / >45
1 sprinter: 49 < X < 52 / 65+ / 65+ (optional) / <55 / 87+ / 60+ / <45
This team is, in my opinion, the best compromise: effective everywhere without being too expensive.
If you want only two puncheurs instead of three, that’s possible. The extra slot can be replaced by another rouleur or breakaway rider. For a 10th rider, you can choose a rouleur, another breakaway rider, or even another sprinter.
Salaries are slightly higher than for the sprint team.
3. Climber Team
1 climber leader: 85+ / 60+ / 70+ / <55 / 53+ / 59+ / >45
2 puncheurs (helpers): 68+ / 76+ / 70+ / <55 / 55+ / 67+ / <45
1 breakaway rider: 58 < X < 62 / 77+ / 65+ (optional) / <55 / 55+ / 67+ / <45
2 rouleurs: 49 < X < 52 / 80+ / 70+ / <55 / 53+ / 70+ / <45
2 domestiques: 49 < X < 52 / 73+ / 70+ (optional) / <55 / 45 / 65+ / >45
1 sprint-rouleur: 49 < X < 52 / 70+ / 65+ (optional) / <55 / 80+ / 60+ / <45
This is the hardest team for a beginner to manage because the climber is expensive and requires a strong supporting team, which increases overall cost.
The goal is to be able to join breakaways even in tough races, as well as compete in flat races. The money earned by the sprint-rouleur (or a cheap sprinter if you find one) will help develop the team.
For the 10th rider, you should choose either a sprinter or a rouleur.
Automatic team
You can also choose to create an automatic team. It’s much faster and lets you discover the game without hassle.
The auto-team feature allows the game to generate a team for you. First, you’ll be asked what type of team you want.
The game will take your choice into account and provide you with 9 riders matching the selected profile.
Salaries
Another key element is payroll. Avoid exceeding 375,000, which is the reimbursement per race. If salaries are higher, you’ll pay the difference yourself. With 1–2 leaders, you should usually stay within limits.
Races can also be run with 7 or 8 riders, with lower salary caps (295,000 and 335,000 respectively).
Tip: Start with 9 riders to ensure participation in all races.
Also, always use realistic names and nationalities—it matters for national championships!
Part 2: Race Interface
On the new RSF interface, you have several tabs:
1st tab – Race:
Just to see the state of the race with all riders, gaps, etc. Basically the main screen.
2nd tab – Tactics:
Also very important. This is where you adjust all parameters, assign helpers for teammates, choose which riders to follow, manage sprints, etc. You can also see your riders’ energy and form here.
3rd tab – Map:
Not important ^^
4th tab – General Classification:
Only important for stage races; shows the overall standings.
5th tab – Mountains (KOM):
Same idea, just for the mountain jersey.
6th tab – Points:
For the green jersey.
7th tab – White Jersey:
For the best young rider in a tour.
8th tab – Final Sprint:
This window only appears during the final sprint!
Above all that, you have the race profile, the weather, and a small bar showing riders and time gaps between groups.
Below, you have the race report, kilometer by kilometer, showing everything that happens.
And further below, there’s the chat with other participants in your race!
TACTICAL INTERFACE :
Here’s a visual explanation of how the screen works:
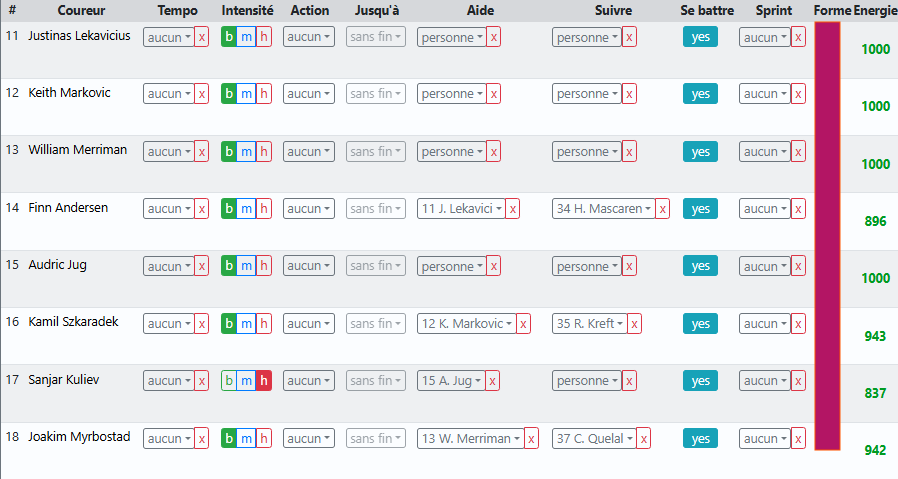
You have one row per rider. For each rider, you can decide:
Whether they set the pace (tempo)
If yes, at what intensity (green is the lowest, blue is medium, red is the strongest possible). Intensity also applies to attacks if you decide to launch one.
A specific action : (drop back to the same level as their leader, drop back completely, keep riding if dropped, etc.)
“Until” : (select the condition for the action)
Help: here you select the rider who will be helped by the rider on that row. For example, rider #14 (Finn Andersen) is helping rider #11
Follow: follow an opposing rider of your choice
Fight: yes or no. Useful for getting through selective kilometers (cobbles, climbs, sometimes descents)
Sprint: mainly useful for the final sprint or intermediate sprints. Several options: “launch” (500m), a set distance (between 450 and 50), or “follow” (to appear in the final sprint)
Form: (hidden here), between 85 and 100. When you recruit riders, they will be at 90.6. A rider at 100 form gets +2 to their abilities compared to displayed stats. A rider at 85 form gets -2.
Energy: 0 is the minimum, 1000 is the maximum.
RACE INTERFACE :
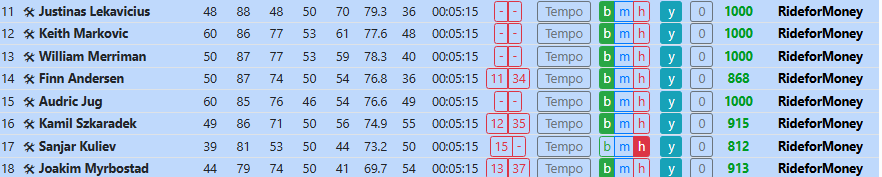
The information is linked to the tactics tab (and vice versa). In this tab, you can view the race and the different groups within the peloton.
The main difference is that you can launch an attack directly from this interface. It’s the small “0” next to your riders’ energy.
In this example, if rider #17 wanted to attack, you would need to click on the “0”. This will then display the kilometer where he will attack, and his attack will be at red intensity. For the other riders, this attack would be at green intensity if they decided to attack.
Part 3: Races
First, analyze the race profile to match rider types.
Protect your leaders by using domestiques. Usually one domestique is enough, but sometimes two are needed depending on conditions.
How to assist:
Assign a domestique to “help” a leader in the tactics panel. This reduces the leader’s energy loss.
For example : rider A is your domestique, rider B is your leader.
In the domestique's settings (A), select rider B to protect. It means that rider A will protect rider B.
Rider A will lose more energy whereas rider B will save energy or lose less rapidly (in high slopes/flat if the pace is high) or gaining energ easily (on downhill)
A rider can be helper, helped or being neutral (no helper, no helped).
If you don’t have a top leader, send 1–2 riders in early breakaways (preferably with ~75 flat and decent regeneration).
Other key tips:
Save energy (don’t overwork in breakaways or peloton unless favorite)
Follow wheels wisely (depends on stat gaps and terrain)
Respect fair play (e.g. no more than 2 attackers per km, avoid excessive peloton control)
In the final, attacking is difficult—you must be stronger or fresher than tempo riders. Otherwise, aim for the sprint.
Also, read and use the chat—it can help!
Tip: Be online during races (same time daily, especially for tours) to avoid disqualification.
Part 4: Sprints
A sprint window opens after the last km for 10 minutes. Each minute = 50m (from 500 to 0).
The rider in front at the end wins. (in the peloton or in the front of the first group)
Key factors:
- Sprint stat
- Flat stat (important early for positioning)
- Terrain slope (affects mountain/downhill stats)
Sprint strategies
1. Train (recommended)
Use teammates to lead out your sprinter in sequence (from weakest to strongest), ensuring they are fresh.
How to do it? Imagine you have 3 riders :
Rider A (75 flat/70 sprint)
Rider B (68 flat/ 86 sprint)
Rider C (65 flat/91 sprint)
(values are just here as an example, but it just shows who is the "weakest" and the strongest). To be efficient, they have to be as fresh as possible before the final sprint.
Rider A's settings :
- Helping rider B
- Set "launch" in the sprint column. (
- Follow nobody else.
Rider B's settings :
- Helping rider C
- Set "follow" in the sprint column.
Rider C settings :
- Helping nobody.
- Set "follow" in the sprint column.
The rider B (and the rider C later on) will have to sprint DURING the final sprint window.
Ofc, you could do a train of 2 riders, 4 etc.. but 3 is more efficient 80% of the time.
2. Following someone
Riskier—can be blocked or disrupted. Especially in this case, your flat and sprint values (and ofc your energy) will be important.
You can put your train into another rider. To make it
Rider A's settings :
- Helping rider B
- Set "launch" in the sprint column. (means he'll launch from 500 M)
- Follow someone else
Rider B's settings :
- Helping rider C
- Set "follow" in the sprint column.
Rider C settings :
- Helping nobody.
- Set "follow" in the sprint column.
Sprint value is key
Waiting longer reduces effectiveness
Following gives a 10% bonus
Cannot follow at 50m
Sprint triggers when the followed rider starts
Part 5: Training
There are 4 sessions per month (5th, 12th, 20th, 27th at 00:40). Riders can gain, lose, or keep stats.
7 training slots available
More slots = higher success chance
Younger riders improve more easily
From age 25–26, you must “cover” stats to prevent loss
From 33, even covered stats can decrease
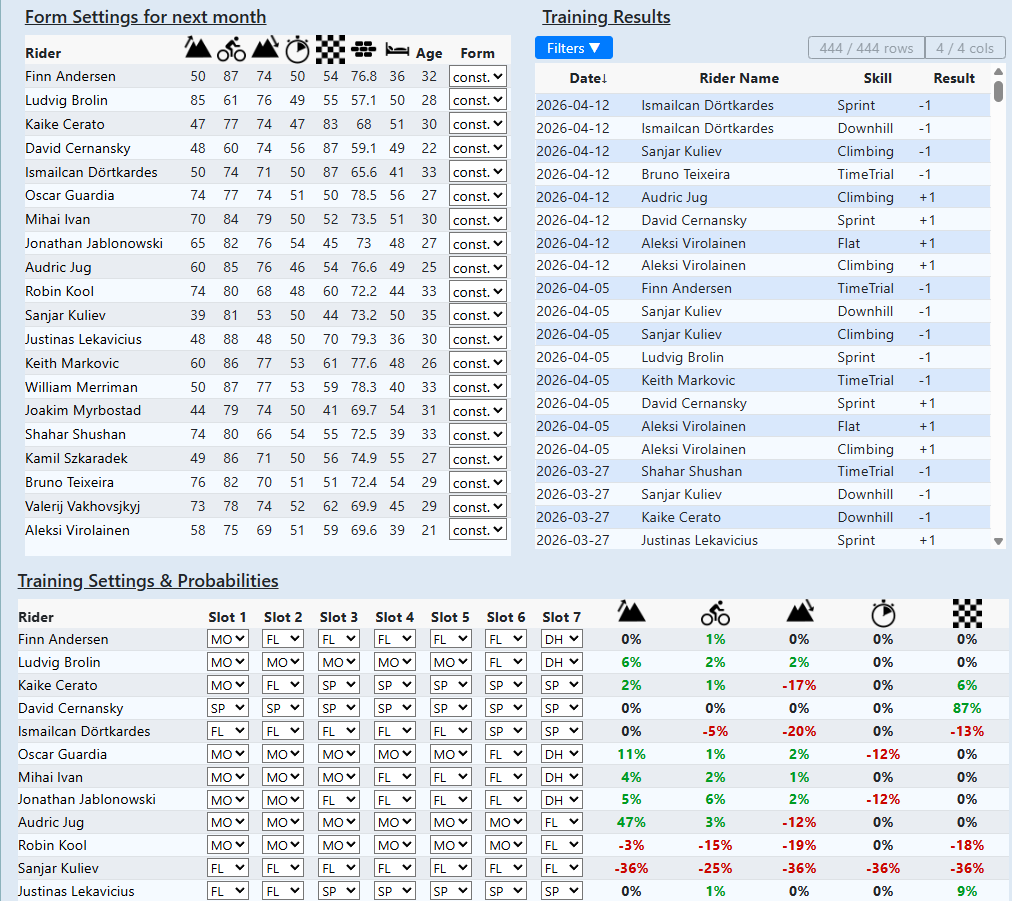
At the top left, you have the list of your current riders as well as the selected day (for next month) when they will reach their peak form (100). A rider at 100 form gains +2 to their abilities compared to the displayed stats. A rider at 85 form gets -2.
Their form increases or decreases by 1 point each day, oscillating between 85 and 100, then back from 100 to 85. For example, a rider whose peak form is on the 2nd (so 100) will be at their minimum form (85) on the 17th, having lost 1 point per day. Then, between the 17th and the 30th/31st, they will gain 1 point per day.
If you don’t select a day before the start of next month, the rider will have constant form, which is 90.6 for the entire next month.
At the top right, you have the summary of recent training sessions to see what riders have gained or lost.
At the bottom, you have the percentages and “slots” showing the probabilities of gaining (in green) or losing (in red) a point.
This should help you get started.
And if you have questions, use the chat—there are often very experienced managers there. Even if they speak French or other languages, don’t worry!